Signing and verifying messages with RSA keys, using Python and C#
Oct 9, 2018
software
Overview
I recently needed to:
- Create a message on a Linux server.
- Some time later, read the message on a Windows computer.
- Be pretty darn sure the message hadn’t been tampered with.
Public-key cryptography (aka asymmetric cryptography) to the rescue! Paraphrasing Wikipedia’s definition, public-key cryptography is a system that uses pairs of keys: public keys which may be shared widely, and private keys which are known only to the owner. After generating such a pair of keys, you can perform two main functions:
- Use a public key to encrypt a message which can only be decrypted by the matching private key.
- Use a private key to sign a message that can be verified by the matching public key.
We’re interested in function #2 above. This is a beginner tutorial on how to generate a pair of public/private RSA keys, use the private key to sign a message using Python 2 on Ubuntu 14.04, and then later use the public key to verify the message using C# and .NET 4 on Windows 10.
Disclaimer: I’m not a cryptography or security expert. That also means if I can understand this stuff, anyone can!
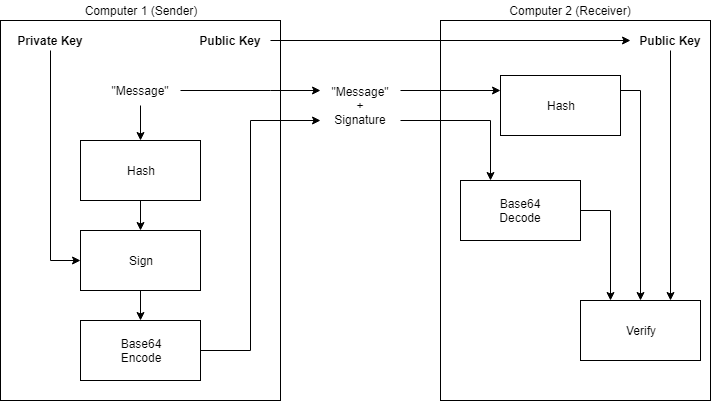
For you visual learners, the image below is conceptually what we’re going to accomplish:
Generate public/private RSA keys
In your favorite Linux shell, use openssl to generate a private key, then a public key.
$ openssl genrsa -out private.pem 2048
$ openssl rsa -in private.pem -pubout -out public.pem
If you open up private.pem, it should look something like this:
-----BEGIN RSA PRIVATE KEY-----
MIIEpAIBAAKCAQEAyJ9bvTy6TMxugIsnMjSV7yk0Jl5Op8JhNktOEGJBaPzZqTSG
1lPGmYLobE9c7fakcLrR8ANkZRjgLJey0vE13lspDVXSEwFCI+75ZGC6gja5c/Qo
SmBM6dsgvg210c7dC/apJE4oiOQttfjt+mMAsMb7VSIuDzPD6HAvIhdKpZSY6EVJ
JJ1m14tJ1OEjpLqB6cEaLD1RUSB+9UomrSrC32+ESsjKLA+H8itnGbzNnyKLGlny
IpzHVM8aSfRea/3YSnKDIStGlnwOFW6hcpJhpOL3gpiZjxmNKTdz8wD2BZlvFwaB
gdcbfE1JtfC6AkV2RhfdK7qh4mKVhDAI4Yf7DwIDAQABAoIBADhEoclQl/vkNnXt
EWA+aXL7fnnoZ20b0oIU2t8zf57/k9imN88zDfeORLvkAm9nhrVrYGhNu0GzmWRI
Y8pQBsjHjpsD3/iemLtVUjM6AfV1fcwsxYQewFOytts3IzCmMU8irkvVc/746G0q
VSytycrK9EDrZjmzThYKKN4J5FDN/ipWlaeVnBMBOAHrS6OWEnN1fJNN2QXIzY+q
domp6kuyskjieUzFOQ2N32p5Uvfek3bsFpIDpBdOK6rBxd4TaJF6B/IW9lCCNFnM
EVLRq4s9Qo/zCSj3EDshylbUQIrxtcUBQNsdj95/CBQVK+6RJbos8+OmWklbr8VW
jlIzmRECgYEA8vE7vU3yDTc3gg1x4VPMqhgV+HDnyqm/QH1arAXWWFJzZiRqn04x
p271tXbIjneT7NM8iT5qInlsSnylHSSAnCnWJHHqrbK82RrgWpjAh2ied9Q9ygOq
dT6LVIlJHaWzoFDl9xVArTF6mOcsjmkYzVtzSPk7BplKUMpMrEcZNDkCgYEA02fT
NyhO55R4kAL/e9L5NRHVP3EfdIaDeQpsfSUWjRibfVJhwhZVy2pkYQigvuFXZDGI
mi3bZq+J7yrlUHZWU5xR3b4n7RaaRfvtwvIfiNvWOWLt7LHbSvjO8tm6aqbQB3n4
vPKejPzNjq8T8kbVm/zH5d+LGPwMdMoRNy8C+YcCgYEAiAPvgmklX6jOdw23+IPG
TmT1yAbOf3TSEvUb0rvh6ckfuswgtdg9jJRfFJ3QY5MnSqxpdB1xpqN8sadfehV5
u/TgY78zuNQdTx/xBEgJYsZ8EnLNtVCgGsxNjaLfQK4JB3TDi7ZmY5EUJo8nLwRA
UpkkznJbTbJ9HQZmLv4PamECgYEAz4mzzwhhPfOB0E9BJPxe7nyNTvTtHmYXl7Jm
Aw1v8CBiNUu08OcgXswZszDXLcznEFOYeVPfehWGYidIbA9gfECQFhJh+90eounJ
5oHv91lqG3hFfwKz+Av+jma1HZKZ010olcXRZTOhURwLhuOHPNWSINeuJF78k4L0
F6qtTu0CgYBwVahJLZS1VfZaR3ZoPW2g1QfChG2kh7JRupZQPhgs0Ll/+mY5Rnd8
j4iffI8iOeKyQJFQutNXaNxborOLQZDvwYSEAxs8AU0l8WVHEmxOsyQUbO2EvWNS
aDNonwQjOegmkff7UuC0iOqXaL30LtD7l0yZ6FdPJm4a9UNFbcmq3A==
-----END RSA PRIVATE KEY-----
And public.pem should look like this:
-----BEGIN PUBLIC KEY-----
MIIBIjANBgkqhkiG9w0BAQEFAAOCAQ8AMIIBCgKCAQEAyJ9bvTy6TMxugIsnMjSV
7yk0Jl5Op8JhNktOEGJBaPzZqTSG1lPGmYLobE9c7fakcLrR8ANkZRjgLJey0vE1
3lspDVXSEwFCI+75ZGC6gja5c/QoSmBM6dsgvg210c7dC/apJE4oiOQttfjt+mMA
sMb7VSIuDzPD6HAvIhdKpZSY6EVJJJ1m14tJ1OEjpLqB6cEaLD1RUSB+9UomrSrC
32+ESsjKLA+H8itnGbzNnyKLGlnyIpzHVM8aSfRea/3YSnKDIStGlnwOFW6hcpJh
pOL3gpiZjxmNKTdz8wD2BZlvFwaBgdcbfE1JtfC6AkV2RhfdK7qh4mKVhDAI4Yf7
DwIDAQAB
-----END PUBLIC KEY-----
Now’s the time to mention that while the public key is meant to be distributed to anyone who needs it, the private key must be kept secret. For now, let’s use chmod to ensure only we can read private.pem.
$ chmod 400 private.pem
$ ls -l
total 8
-r-------- 1 epalm epalm 1679 Oct  4 03:34 private.pem
-rw-r--r-- 1 epalm epalm  451 Oct  4 03:34 public.pem
Sign the message with Python
Unfortunately, I couldn’t find a way to use stock Python to play with RSA key signing, and needed a 3rd party library called pycryptodome (an active fork of, and drop-in replacement for, the idle-since-2014 pycrypto library). To install pycryptodome you’ll need to install a few dependencies first:
$ sudo apt-get update
$ sudo apt-get install python-pip python-dev build-essential libgmp3-dev
$ sudo pip install pycryptodome
Now let’s write some Python to sign a message with our private key. We’ll also verify the message with our public key, which isn’t strictly necessary at this point, but is a good sanity check. This code was written with help from the pycryptodome documentation.
from base64 import b64encode
from Crypto.Hash import SHA256
from Crypto.PublicKey import RSA
from Crypto.Signature import pkcs1_15

# create a message
message = 'hello'

# load private key
with open('private.pem', 'r') as f:
    private_key = RSA.import_key(f.read())

# hash the message
digest = SHA256.new(message)

# sign the digest
signature = pkcs1_15.new(private_key).sign(digest)

# load public key
with open('public.pem', 'r') as f:
    public_key = RSA.import_key(f.read())

# verify the digest and signature
pkcs1_15.new(public_key).verify(digest, signature)

# base64 encode the signature
signature_b64 = b64encode(signature)
Let’s break down what’s going on here.
First, we read the private key from disk, and import it. This gives us an RSA key object to work with:
# load private key
with open('private.pem', 'r') as f:
    private_key = RSA.import_key(f.read())
Next, we hash the message, because, for technical reasons I’m not qualified to explain, the size of the message an RSA key can sign depends on the size of the RSA key itself. The 2048 bit key we generated above can handle RSA operations on messages up to 255 bytes. In our little example here, our message is simply hello (5 bytes, depending on string encoding), but consider that the message we want to sign could be anything, e.g. a large XML document, or a large binary file. Hashing the message, in this case with the SHA256 hashing algorithm, generates a 32-byte representation of the message (no matter the original size of the message), and that’s what we want to sign:
# hash the message
digest = SHA256.new(message)
Now we can sign the message hash (also called a “message digest”, or just “digest”), using our private key:
# sign the digest
signature = pkcs1_15.new(private_key).sign(digest)
At this point we’re done signing the message. However we can also use pycryptodome to verify that our private key, public key, message, and signature are all singing the same tune. To do this, we just load the public key from disk and import it:
# load public key
with open('public.pem', 'r') as f:
    public_key = RSA.import_key(f.read())
And then we verify with the public key, the message digest, and the signature:
# verify the digest and signature
pkcs1_15.new(public_key).verify(digest, signature)
If the call to verify doesn’t throw an error, we’re good! We’ve got a public key, a message, and a signature we can now send to anyone, and using MATH they can verify (A) we composed the message, and (B) no one has tampered with the message, assuming of course that we’ve done a good job keeping the private key a secret.
Lastly, we base64-encode our signature. We do this because the signature at this point is just a collection of 256 bytes, and we’re probably going to be sending it somewhere (along with the message), so base64 encoding turns it into a portable/printable string:
# base64 encode the signature
signature_b64 = b64encode(signature)
If all went well, signature_b64 now looks like this:
i5cldlxoVQdE/pCwwmqNHv0MOizb7sU4ssNPeQt/CtVtn/8RkeIX6BBX/vMtuJG0BEm8tLQ1zh5Rykkf4lYuRj1h0Ad3FiI7ANTSrZ/84FpP2TgHV4OyVlIsoKEnyyAMw3rQJWTuIMr6WW0buIFbNSfrokhtPRRbXOgP+6biWifK1zZeChbnNkrK8q/mPz28hMIFpqMDfo4UJ3ZkcZgUw0J5rSTzsQDikQpUzgsZfSuv5B+rb9Qb/7vqSmy+QjqL3QdPmmadUzzQNysUgMgGqqdINmLwdFgXHN2jcvRLVdM9vqblU1Ch/zNPUqIRv0amT9MkNZ/mnH2G94LC7RVIMA==Verify the message with C#
Unfortunately (again), I couldn’t find a way to use stock C# to play with RSA key signing and verifying using the *.pem files we generated earlier, and needed a 3rd party library called BouncyCastle. (If you work in a corporate environment, try not to tell your boss you’re using a free 3rd party library called “BouncyCastle” for sensitive cryptographic applications.) Use Nuget to install BouncyCastle:
Install-Package BouncyCastleNow let’s write some C# to verify the message. This code was written with help from various StackOverflow questions and answers, because I couldn’t find any BouncyCastle documentation relating to signing/verifying RSA keys.
using Org.BouncyCastle.Crypto;
using Org.BouncyCastle.Crypto.Parameters;
using Org.BouncyCastle.OpenSsl;
using Org.BouncyCastle.Security;
using System;
using System.IO;
using System.Security.Cryptography;
using System.Text;

namespace ConsoleApplication
{
    class Program
    {
        static void Main(string[] args)
        {
            // "-----BEGIN PUBLIC KEY-----"
            var publicKey = File.ReadAllText("public.pem");

            // "hello";
            var message = File.ReadAllText("message.txt");

            // "i5cldlxoVQdE..."
            var signatureB64 = File.ReadAllText("signature.txt");

            // import public key
            var rsa = new RSACryptoServiceProvider();
            rsa.ImportParameters(PublicKeyParams(publicKey));

            // hash the message
            byte[] buffer = Encoding.ASCII.GetBytes(message);
            byte[] digest = new SHA256Managed().ComputeHash(buffer);

            // base64-decode the signature
            byte[] signature = Convert.FromBase64String(signatureB64);

            // verify the message digest and signature
            bool verified = rsa.VerifyHash(digest, CryptoConfig.MapNameToOID("SHA256"), signature);

            Console.WriteLine(verified);
            Console.ReadLine();
        }

        private static RSAParameters PrivateKeyParams(string privateKey)
        {
            var pemReader = new PemReader(new StringReader(privateKey));
            return DotNetUtilities.ToRSAParameters((RsaPrivateCrtKeyParameters)(((AsymmetricCipherKeyPair)pemReader.ReadObject()).Private));
        }

        private static RSAParameters PublicKeyParams(string publicKey)
        {
            var pemReader = new PemReader(new StringReader(publicKey));
            return DotNetUtilities.ToRSAParameters((RsaKeyParameters)pemReader.ReadObject());
        }
    }
}
Again, let’s break this down. Let’s assume we’ve transferred the public key, the message, and the signature to a computer running Windows, in the form of a few files, namely message.txt, public.pem, and signature.txt.
First, we load our public key, message, and base64-encoded signature from disk:
var publicKey = File.ReadAllText("public.pem");
var message = File.ReadAllText("message.txt");
var signatureB64 = File.ReadAllText("signature.txt");
Next, we import the public key. Here’s where we need BouncyCastle to convert a .pem file to RSAParameters using PemReader and ToRSAParameters along with some casting backflips (check out the PublicKeyParams method, and I’ve also included PrivateKeyParams for completeness). This gives us an RSA key object to work with:
// import public key
var rsa = new RSACryptoServiceProvider();
rsa.ImportParameters(PublicKeyParams(publicKey));
Hash the message by sending the bytes of our message through our SHA256 hash function:
// hash the message
byte[] buffer = Encoding.ASCII.GetBytes(message);
byte[] digest = new SHA256Managed().ComputeHash(buffer);
Remember we base64-encoded our signature, so we need to convert that back:
// base64 decode signature
byte[] signature = Convert.FromBase64String(signatureB64);
Lastly, we call rsa.VerifyHash with the message digest and signature. We also need to indicate which hash function was used on the message (in our case it was SHA256).
// verify the message digest and signature
bool verified = rsa.VerifyHash(digest, CryptoConfig.MapNameToOID("SHA256"), signature);
If rsa.VerifyHash returns true, we’re done! In other words, again, the message is (A) from who we expect, and (B) hasn’t been tampered with.
Final thoughts
At the time of writing (2018), RSA key signing and verifying with .pem files doesn’t appear to be possible with stock Python or C#, and requires a couple of free-as-in-freedom 3rd party libraries. Thanks, Open Source Software! (The pycryptodome library is BSD licensed, and the BouncyCastle library is MIT licensed.)
Hopefully this post lowers the barrier to entry and demystifies the topic a little bit. Now go sign some messages!
PS: If you find any errors in my posts, or just want to talk about their contents, please get in touch with me.